I recently started using AlpineJS for light interactivity UI components. For the Dev Book Club site I needed a fairly straightforward list of checkboxes I could submit to a Netlify Form and export to a spreadsheet for further processing. I decided that while I could likely use native checkboxes in the browser I wanted to try something a little different. Here is what I came up with.
The Problem
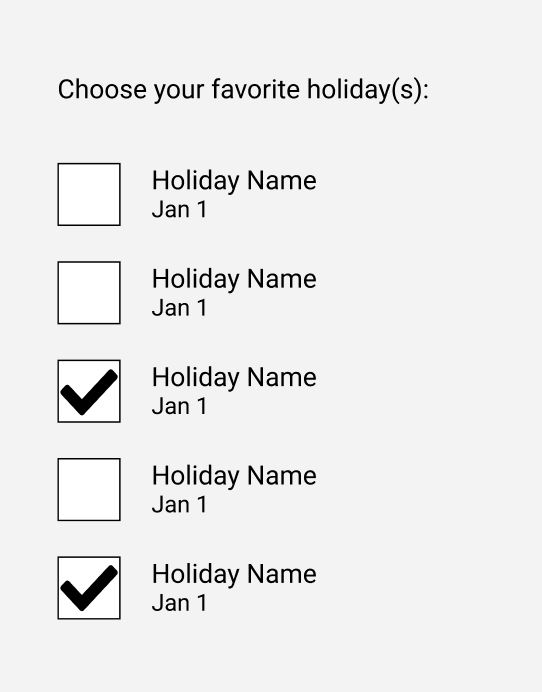
To simplify the example I am going to make a form which asks for the user to select their favorite holidays from a pre-set list. The UI will be a vertically stacked set of checkboxes with the name of the holiday and the day (month day) on which it falls. Something like this:
The Behavior
The interaction requirements are as follows:
- user is allowed to click a checkbox to toggle it on or off
- user can click anywhere on the row to toggle that holiday as selected
- clicking an unselected holiday toggles a check mark inside the check box
- click a selected holiday removes the check mark from the check box
- when checked a reference identifier for the holiday is added to a comma-separated list of selected holidays
For example, suppose you had the following Holidays:
- New Year's Day
- Valentine's Day
- Memorial Day
- Thanksgiving
If the user selects Valentine's Day, the check box next to it should have a check mark inside and the identifier (2) for Valentine's Day should appear in a comma separated list of selected holidays.
If the user then selects "Memorial Day," the comma-separated list should read "2,3". If Valentine's Day is then deslected, the list should read only "3". So on and so forth.
The Markup
For the markup I am using TailwindCSS and this first sample will not have any of the attributes for the behavior with AlpineJS. It will solely be styled HTML.
<form class="block p-10">
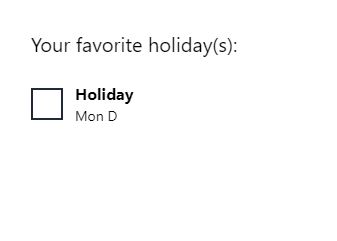
<label class="block">Your favorite holiday(s):</label>
<div class="space-y-6">
<div class="flex items-center">
<div class="w-8 h-8 mr-3 border-2 border-gray-800"></div>
<div>
<div class="font-bold">Holiday</div>
<span class="block text-sm">Mon D</div>
</div>
</div>
<input type="hidden" name="selectedHolidays">
</form>
Rendered, our form looks like this:
Building the AlpineJS Data
Working through this iteratively, the build follows these steps:
- Add data/behavior with
x-dataon a root HTML element - Iterate list of holidays and build checkboxes for them
- Wire click behavior to checkboxes/associated elements to toggle selection
- Add UI indicators to display selections
- Add and verify the form field holding the selected values
Step 1: Add x-data
We know we need a list of holidays, and the structure is roughly Holiday[id,name,date] so we can start there.
<form x-data="{ holidays: [{id: 1, name: 'New Year\'s Day', date: 'Jan 1'}] }" class="block p-10">
  <!-- snip -->
</form>
Step 2: Iterate holidays with template and x-for
Then we need to loop over each of those holidays and add a checkbox and associated label for each of those. To accomplish this we'll use an x-for with a <template>.
<form ...>
    <div class="space-y-6">
      <template x-for="holiday in holidays">
        <div class="flex items-center">
          <div class="w-8 h-8 mr-3 border-2 border-gray-800"></div>
          <span>
            <div x-text="holiday.name" class="font-bold"></div>
            <span x-text="holiday.date" class="block text-sm"></span>
          </div>
        </div>
      </template>
    </div>
</form>
Step 3: Add behavior for toggling holiday selection
We need a way to keep track of holidays which are selected and a method to handle adding or removing holidays from the selected list. To store this data we will add it to our data object.
<form x-data="{ holidays: [{id: 1, name: 'New Year\'s Day', date: 'Jan 1'}], selectedHolidays: [] }" ...>
  ...
</form>
Everyone has their own threshold for when to extract AlpineJS components from markup and when to keep them inline. I will admit to being an early extractor. This is about the point where I will remove the contents of the x-data attribute and add a script element.
<script>
  let holidayForm = function() {
    return {
      holidays: [
        { id: 1, name: 'New Year\'s Day', date: 'Jan 1' }
      ],
      selectedHolidays: []
    }
  }
</script>

<form x-data="holidayForm()"...>
  ...
</form>
I don't know about you but I feel better already. now that we are past that hurdle, we need to add a mechanism to handle adding a holiday to the selectedHolidays array when it is selected.
<script>
  let holidayForm = function() {
      return {
        ...,
        toggleHoliday(id) {
            if (this.selectedHolidays.indexOf(id) > -1) {
              this.selectedHolidays = this.selectedHolidays.filter(h => h !== id)
            } else {
                this.selectedHolidays.push(id)
            }
        }
      }
  }
</script>
Now we will attach this method to as the click handler for the checkboxes. However, to make this a little easier to use we will attach to the div holding the checkbox and the label.
<form ...>
  ...
  <div>
    <template x-for="holiday in holidays">
      <div @click="toggleHoliday(holiday.id)"...>
        ...
      </div>
    </template>
  </div>
At this point you can verify the behavior using debugging tools to inspect that clicking one of those divs adds the id of the holiday to the selectedHolidays array.
Step 4: Reflect selections in the UI
The last bit of UI work we need is to show which holidays are selected, and which are not. To do this we will add a check mark in the checkbox div. We could alternatively add a background color as the indicator, but a checkmark is easy enough.
You can use any SVG you'd like. Font Awesome or Heroicons are good choices. For this demo I made my own and ran it through SVGOMG and will inline it.
<form x-data="holidayForm()"...>
  ...
  <div...>
    <template x-for="holiday in holidays">
      <div @click="..."...>
        <div class="w-8 h-8 mr-3 border-2 border-gray-800">
          <svg x-cloak x-show="holidaySelected(holiday.id)"
               viewBox="0 0 148 185"
               xmlns="http://www.w3.org/2000/svg"
               fill-rule="evenodd"
               clip-rule="evenodd"
               stroke-linejoin="round"
               stroke-miterlimit="2">
            <path d="M42.24 153.673c-.736-3.425-1.52-6.861-2.499-10.287-3.75-13.125-6.336-27.497-12.973-39.665-3.552-6.512-8.024-12.371-12.112-18.503a8.004 8.004 0 00-11.094-2.219 8.004 8.004 0 00-2.219 11.094c3.827 5.739 8.054 11.195 11.378 17.29 6.077 11.141 8.202 24.38 11.636 36.398 2.057 7.201 3.213 14.454 4.958 21.53.504 2.045 1.184 4.177 1.684 6.177.36 1.441 1.393 4.234 1.393 4.234a8 8 0 0015.021-.129s1.324-3.808 2.285-5.57c2.202-4.036 4.402-7.991 6.368-12.169 6.24-13.258 13.433-25.884 20.896-38.478 21.532-36.336 37.88-79.472 68.126-109.719a8.004 8.004 0 000-11.314 8.003 8.003 0 00-11.313 0c-31.179 31.178-48.382 75.422-70.577 112.876-7.465 12.597-14.658 25.233-20.958 38.454z"/>
          </svg>
        </div>
      </div>
    </template>
  </div...>
</form>
Now we add the holidaySelected(id) method to the object we use for x-data.
<script>
  let holidayForm = function() {
    return {
      ...,
      holidaySelected(id) {
          return this.selectedHolidays.indexOf(id) > -1;
      }
    }
  }
</script>
Step 5: Add field to represented selected values in the form
Last step is to add a field (and we are goingto add one small bit of debugging code just for demonstration purposes.) Our form is going to submit a list of selected holiday ids as an element named selectedHolidays. To do this we will add a hidden input to the form and bind it using x-model to the selectedHolidays array in our data object.
<form>
  ...
  <div class="space-y-6">
    ...
    <input x-model=selectedHolidays" type="hidden" name="selectedHolidays">
  </div>
  <input
</form>
The magic here is that the text input (well, hidden) is bound via x-model to an array from our data source. Since JavaScript will serialize the array into a comma-separate list we need no extra effort to make this behave as intended.
To see what this input value holds without submitting form for a demo I am going to use the $nextTick magic to output the value of this input to the console.
<script>
  let holidayForm = function() {
      return {
        ...,
        toggleHoliday(id) {
          ...
          this.$nextTick(() => {
              console.log(this.$el.querySelector('input[name=selectedHolidays').value)
          });
        }
      }
  }
</script>
What this will do is each time you change the selection, after AlpineJS updates the dom it will run this function and output the value of that hidden input. This should show whether or not the list is changing as we expect.
The Demo (on Codepen)
I have added this demo to Codepen so you'll be able to use it and see the console output in real time. The minor adjustment is instead of numerical IDs for the holidays I used text names to make it a lot easier to correlate.
Putting it all together with Netlify Forms
For the use case I was working on, this form was to live on a static site generated with Jigsaw by Tighten and hosted on Netlify. Because it is a static site there is no backend to handle processing forms. However, Netlify offers a product, Forms which will handle receiving posts from forms embedded in your markup and store the responses. You can export these as CSV or attach them to other services/platforms using Zapier or webhooks.
To make use of Netlify forms we need to do two things to the markup:
- Add
data-netlify="true"to tell Netlify to process this form when the site is built; and - Give the form a
namewhich corresponds to the form responses container in the Netlify UI.
If you don't do number 2, netlify will name the forms with the pattern form1, form2, etc. which is very hard to manage.
The code changes:
<form x-data="holidayForm()" class="block p-10" name="favorite-holidays" data-netlify="true">
  ...
</form>
That's it. When this site is built by Netlify's build tool it will process the form and add another hidden input to it holding the name.
Submitted data
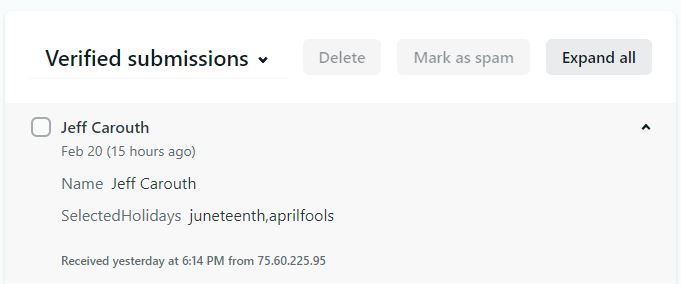
For a test run on the Netlify platform, I added a form to a page which had a name input as well as this holiday selector. I added my name and selected April Fool's Day and Juneteenth and submitted the form. The results show up in Netlify as shown below.
Why not use actual checkboxes?
This is a great question. I tried this out and it was not intuitive on how to generate the form for processing with Netlify when the checkbox don't exist until the page is rendered. If I were not using Netlify Forms to handle this component I would likely opt to make the checkboxes work since that is more semantically representative of what is actually happening in the form.
Here are the changes required to submit the dynamic checkboxes:
<script>
  let holidayForm = function () {
    return {
      ...
      message: '',
      ...,
      submit() {
        const formData = new FormData(this.$el);
        const self = this;

        fetch('/', {
          method: 'POST',
          headers: {'Content-Type': 'application/x-www-form-urlencoded'},
          body: new URLSearchParams(formData).toString(),
        }).then(resp => {
          if (resp.ok) {
            self.message = 'Form submitted successfully';
          } else {
            self.message = 'Error submitting form';
          }
        }).catch(e => {
          self.message = 'Big error submitting form';
        })
      }
    }
  }
</script>

<form x-data="holidayForm()" class="block mt-10 p-10" name="holiday-form" method="post" data-netlify="true">
  <label class="block text-xl">Your favorite holiday(s):</label>
  <div class="space-y-6">
    <template x-for="holiday in holidays">
      ...
      <input class="hidden" type="checkbox" x-bind:name="`holidays[${holiday.id}]`"
               :checked="holidaySelected(holiday.id)">
      </div>
    </template>
    <input x-model="selectedHolidays" type="hidden" name="selectedHolidays">
  </div>

  <div x-cloak x-show="message" x-text="message" class="my-8 text-blue-700"></div>
  <button @click.prevent="submit()" type="submit" class="block mt-12 border px-4 py-2">Submit</button>
</form>
The bulk of the change is I added a input[type=checkbox] for each of the holidays in the template and changed the form handling to submit via XHR with a @click attached to the submit button. The rest of the change is form handling in the submit by sending a POST request to '/' with form encoded values (this is how it works on Netlify's platform.)
The result of submitting this form is a request represented by this cURL command:
curl 'https://domain/' \
  --data-raw 'form-name=holiday-form&holidays%5Bnewyears%5D=on&holidays%5Bjuneteenth%5D=on&selectedHolidays=newyears%2Cjuneteenth'
Which translates to a payload of:
form-name: holiday-form
holidays[newyears]: on
holidays[juneteenth]: on
selectedHolidays: newsyears,juneteenth
This looks like it should work. However, when looking at the form submissions in Netlify's UI the holidays array values are not present likely because the original form processing during site build did not register these fields.